Friday, January 3, 2014

FYI Essential Oils for Eczema

Eczema is a chronic condition characterized by extremely dry skin, inflammation and red clusters of bumps that can become scaly, thick and crusty. 
 
This is never fun to deal with and trying to get rid of it can be a constant battle. Although a natural treatment may take longer for healing, however there are some amazing essential oils for eczema that have a more lasting effect without the negative side effects of drug therapy.
 
Essential Oil Blends
One of the best ways to use aromatherapy oils for eczema is to make a blend. In order to do this, you should mix a carrier oil with several drops of healing essential oils. It is very important to dilute your blend, as essential oils are highly concentrated and could make your skin worse if applied directly to the skin. Ideal carrier oils include primrose, avocado, almond or jojoba oil; all of these are rich in omega fatty acids and other nutrients. For every two ounces of carrier oil, blend twenty-five drops of essential oil in with it. Make sure to store it correctly, in an airtight plastic or glass container, away from heat and light.
 
What Essential Oils Should I Use?
This is a good question to ask yourself when deciding which aromatherapy oils to use for your eczema. There are a variety of oils that can help; here is a list of a few and their specific properties:
• Geranium Oil: Often used in skin treatments for its normalizing and balancing properties.
• Lavender Oil: Has antibacterial, anti-inflammatory, calming, and normalizing properties. It also supports immune health and is extremely beneficial for alleviating stress.
• Sandalwood Oil: Works as an antiseptic and a skin moisturizer.
• Tea Tree Oil: Protects the skin from infection, as an antiseptic, anti-bacterial, anti-viral and anti-fungal oil. This does not blend as well with other oils because it has a distinct smell.
• Clary Sage Oil: Is an anti-inflammatory and helps minimize stress and anxiety.
 
Most oils have a great deal of health benefits, and by using them you will do more for yourself than just treat eczema. They are all used for aromatherapy and can reduce stress and anxiety, a common trigger for eczema. Give these aromatherapy oils for eczema a try.
 
As a form of alternative medicine, aromatherapy is gaining momentum. It is used in a diverse range of applications for pain relief, mood enhancement and increased cognitive function. Aromatherapy is something anyone can start doing to provide increased health and wellness to themselves and their family. 
 
Grab a carrier oil and your favorite essential oils and get started! By
Essential Oils for Eczema
 
 
Originally posted on http://www.medimiss.net/2013/04/essential-oils-for-eczema.html


Read more: http://www.medimiss.net/2013/04/essential-oils-for-eczema.html#ixzz2pOBXjdlc


FYI The top 10 best uses for peppermint essential oil

Peppermint essential oil is one of the most versatile essential oils available. 
I carry my bottle with me everywhere I go. It's always in my purse when I am doing errands, working, traveling or at home.
I run into so many instances where I can use and share this wonderful essential oil.
Peppermint essential oil is incredibly powerful. Just one drop equals 28 cups of peppermint tea! Knowing this fact, you can appreciate how effective the oil can be when using it for the therapeutic applications listed below.
Also, my suggestions below are for an AFNOR/ISO certified therapeutic grade peppermint essential oil, such as Young Living's essential oils. Any other grade of essential oil will not produce desired results. But as I always say, be sure to know the growing, distillation and packaging methods of your essential oil supplier before purchasing essential oils.

 The Top 10 Best Uses For Peppermint Essential Oil

The top 10 best uses for peppermint essential oil are:
(and in no particular order)
1. Soothe your digestive discomforts like nausea, diarrhea and indigestion:
Rub 1 or 2 drops on your stomach. Or, put one drop under your tongue or in a cup of water. It will relax the muscles of the stomach and intestines, helping you feel better, fast.
Actually, this is how I got involved with essential oils. My friend gave me a couple of drops of peppermint oil to put on my stomach when I was feeling nauseous. Three minutes later my belly felt completely normal. I was sold! And have been an avid essential oil user ever since.
2. Lower your fever:
Rub 3 drops of peppermint essential oil on the bottoms of your feet. It will penetrate the pores of your feet and enter your bloodstream within minutes, working to cool your body and lower your fever.
This method for reducing fevers is especially beneficial in children. If your child is under 2, dilute the peppermint in an organic olive oil before applying it to their skin. I recommend diluting 1 drop of peppermint to 1 drop of organic olive oil.
3. Clear your stuffy nose:
Dab small amounts of peppermint essential oil on your cheeks and forehead. Within seconds your congestion should begin to lessen and you should be able to breathe easier.
Be very careful not to get it into your eyes! It will burn and make your eyes water! But if this happens, relieve the burning sensation by dabbing some organic olive oil in and around your eye. Olive oil is safe to use in your eyes to reduce the burning. Or you can just wait it out! The burning only lasts a minute or so.
4. Freshen your breath:
Use a smidge of peppermint essential oil on your tongue. You don't need much! It will kill the bad breath bacteria and make your breath smell minty-fresh!
Using it as a breath freshener is a great replacement for chewing sugary gum or sucking on mints. Better for your teeth, too!
5. Cool you off from a hot flash or heat exhaustion:
Rub 1-2 drops of peppermint essential oil on the back of your neck. It will begin to produce a cooling and tingling sensation as it works to cool your core temperature.
A great recipe for cooling off on a hot day is...1 drop of peppermint essential oil in 1 gallon of water. Shake well, pour over ice and enjoy!
6. Energize your tired feet:
Fill a foot basin with warm water. Mix 1 cup of Epsom or Dead Sea salts with 3 drops of peppermint essential oil. Add the salt mixture to the foot bath and soak. The oil and salts will revitalize your aching feet by helping to decrease inflammation and swelling.
If you get pedicures, you can bring this salt mixture and have your nail tech add it to your soaking water for a refreshing pedicure.
7. Relieve your soreness due to inflammation, arthritis and overuse:
Rub 1-3 drops of peppermint essential oil on your area of discomfort. For an added boost, apply heat, like a microwavable heating pack, to drive the oil in deeper. It has high anti-inflammatory properties.
8. Improve your concentration and focus:
Rub 1 drop of peppermint essential oil on your temples whenever you feel scattered and unfocused. Studies have shown that diffusing it increases mental accuracy by 28%.
I love to use it when I'm driving late at night. It helps keep me awake until I arrive home. I also use it for overcoming writers block. I'm wearing it as I write this article!
9. Relieve your headaches and migraines:
Rub 1 drop of peppermint essential oil on your forehead and back of your neck. If you have nausea with your headaches, you can rub it on your belly and also a dab it on your tongue.
It feels great on your skin when you have a headache. Lay a cool towel over the places you dabbed peppermint and the cooling sensation will intensify, bringing much needed relief.
10. Curb your appetite:
Inhale peppermint essential oil 5-10 times per day or whenever irrational hunger strikes you. You can even put a dab on your tongue to deter the cravings.
I personally like to indulge my irrational cravings every once in a while, but try this tip if you're watching what you eat.
Peppermint essential oil tackles many different ailments. It's one of the most versatile essential oils on the planet. Even though I've only listed my top ten list here, there are many, many more uses for peppermint.
The next time you're experiencing one of these health challenges, reach for your bottle of peppermint essential oil. You won't be let down, I promise!  By

Originally Posted by http://www.medimiss.net/2013/02/the-top-10-best-uses-for-peppermint.html
..

DIY How to Make Essential Oils By Distillation


Essential oils are highly concentrated, volatile oils that can be extracted from aromatic plants. Their use dates back to ancient times, and their wide variety of therapeutic, medicinal and culinary uses has ensured their continued popularity.

About 700 different kinds of plants contain useful essential oils, and there are several methods employed to extract them, the most common of which is distillation

While essential oils can be very expensive to buy, they are relatively cheap to distill at home. This guide provides basic instructions on how to extract the oils using the relatively simple and effective water-and-steam distillation process.

Steps


  1. Obtain or build a still (the apparatus used for distilling). You can purchase one specially designed for distilling essential oils; these generally cost a couple hundred dollars or more, but if you plan on doing a lot of distilling and you're not particularly mechanically inclined, this is probably the way to go. If you want to try building a still, you've got plenty of room for creativity - there are thousands of still designs, and even today, many stills are homemade. The key components of a still are:
    • The heat source or furnace, which is used to boil the water. Direct fire, a fire built under the retort is the oldest method for heating the still. Today, we can also use gas, such as propane or butane, and electricity. Fuel costs are a major factor when considering a heat source for you distiller;
    • The holding tank or retort, which holds both the water and, just above the water on a grate or false bottom - picture a vegetable steamer - the plant material to be distilled;
    • The condenser, which collects the steam and cools it, usually by piping it through a tube immersed in cold water, and...
    • The separator, which separates the essential oil from the water vapor. The separator, or Essencier, is one of the most important pieces of apparatus a distiller can have. This enables the distiller to separate the essential oils from the distillate in a passive manner.

  2. Harvest your raw material. The quantity of essential oils contained in a plant varies over the course of the plant's development, so it is essential to harvest at the right time. This will depend on the type of plant, so you need to do some research to determine when to harvest. 
  3.  It is also critical to harvest the plants correctly - careless handling, harvesting the wrong parts, even harvesting at the wrong time of day can reduce the quantity and quality of the essential oils. Again, research the plant you wish to distill. 
  4. If you're buying harvested material, you don't have much control over the harvesting process; look for plants that appear healthy and undamaged, and ask the seller when they were harvested. Generally plants that are in whole form (not crushed or powdered) are best.

  5. Dry the plant material. Drying reduces the amount of oil in each plant, but can greatly increase your yield per batch because you will be able to fit more material into each batch. Drying should be done slowly and NOT in direct sunlight. You can choose not to dry your plant material. Commercially grown plants such as lavender and peppermint may be allowed to dry in the field after cutting for a day or so. The ideal drying method varies from plant to plant, but in general you should not overheat the plants - drying in the shade or even in a dark room minimizes the oil lost - you should not over-dry them, and you must not allow the plants to become wet again before distillation. Distill as soon as possible after drying.

  6. Add water to the tank of your still. Use clean water, ideally filtered or distilled and as soft as possible. If you're using a manufactured still, follow the manufacturer's direction. Otherwise, simply make sure you have enough water in the still to complete the distillation; depending on the plant and on the quantity, distillation can take anywhere from a half-hour to six hours or more after the water boils. 
  7.  Be sure that the water level is close to, but not touching, the false bottom that will hold the plant material. 
  8.  
  9. If you are performing a hydrodistillation (this is useful for delicate flowers or powdered roots, bark or wood), you will need to have your plant material free floating IN the water. 
  10. Add your plant material and pack it tightly in the still. You do not need to chop or cut the plant material, and doing so will cause you to lose some of the oils. The plant material should rest on the false bottom or grate above the water and should touch the sides of the still as little as possible. The layer of plant material can be quite thick as long as it is below the steam outlet (a couple inches below the outlet for a small still, a foot below for a large one).
  11.   Close the still and boil the water. Most plants will release their essential oils at 100 degrees Celsius or 212 degrees Fahrenheit, the normal boiling point of water.

  12. Keep an eye on the still. After a while the distillate should begin to come through your condenser and into your separator. The process should be fairly hands-off, but you will want to ensure that you do not run out of water in your still. Depending on the length of the distillation process, you may also need to change the water in the condenser so that the cooling process continues to work. Follow the instructions for the particular plant you are distilling. 
  13.  
  14. Filter the collected oil (optional). Once your distillation is complete you may filter the oil through cheesecloth or similar dry cotton fabric. Ensure that the cloth is dry and clean - detergent residues as well as dirt can contaminate the oil. 

  1.    Pour the oil into a container for storage. Do this as quickly as possible. Most essential oils can be kept for at least two years, but some have extraordinary shelf lives. To maximize the useful life of your oil, keep it in a dark glass bottle or stainless steel container. Use a clean funnel to pour the oil into the container, and make sure the container is impeccably clean before pouring the oil into it. Store in a cool, dark place.
     
  2. Decide what to do with the hydrosol. The distillation process produces the essential oil and a hydrosol, the term for the water that has been distilled and which collects in the separator. Some hydrosols are usable themselves - rose water or lavender water, for example. If you do not wish to save the hydrosol you can pour it into the still for the next batch (if you will be distilling another batch immediately) or you can discard it.
  3.    You can also place plant material directly into the water. This method is easier, but the quantity and quality of the resulting oil will be reduced. The best distillation method is steam distillation, in which the water is boiled in a separate retort and then pumped into the retort which holds the plant material. This method makes the best quality oil and allows you to control the process better, but it is more complicated (and more expensive) to set up.
  4.  
  5. Percent yields vary from plant to plant. You will need a lot of plant material to make a little essential oil. You may just decide to make hydrosols. If that is the case a small distiller such as a 5 liter or 10 liter copper distiller will be adequate. If you plan to make essential oils, consider obtaining a larger apparatus. A 40 liter rotating column alembic distiller, for example, will enable you to make up to 5 ounces of essential oil and a large quantity of hydrosols.
  6.  
  7. Most essential oils are held in the plant's oil glands, veins and hairs, and these are very fragile. If you disturb or break them, you will reduce your yield of oil, so it is essential to handle the plants with care and to handle them as little as possible. 

  1. Stainless steel and glass are the best materials for your distillation components. Do not use plastic tubing. Copper pots are traditionally used for the retort, and these work well for a variety of plants, but some plants contain chemicals that react with copper to produce unwanted impurities - heavily tinned copper is suitable in all cases, however. Aluminum can also be used, but not with plants, such as wintergreen and cloves, the oils of which contain phenols.
  2.     While distillation removes many impurities, pesticides and herbicides can contaminate your oil. For this reason it is best to use organically grown plants, whether you purchase them or grow your own.
  3.    Essential oils are extremely concentrated, and it is often advisable to dilute them in a carrier oil before applying them to skin.
    The most popular carrier oils are almond oil and grapeseed oil, but a variety of different oils can be used. They can be added during the bottling process or mixed with the pure oil just prior to use. The latter is often preferable because you may not want diluted oil for some uses, and carrier oils often have a shorter shelf life than essential oils.   

Warnings

  • Organic does not mean that pesticides or fertilizers were not applied to the plant, just different from commonly used synthetic pesticides or fertilizers (which some are less toxic than types of organics). Try to find a local grower who can inform you about how the plant was grown.
  • Most essential oils should not be ingested, especially if undiluted, and many should be diluted even when applied topically. Also, some essential oils are toxic. See the external links for more information.
  • For the distillation of most flowers, skip the drying process and distill soon after harvesting.
  • When drying plant material, exercise care not to allow the material to become contaminated with dirt, dust or other contaminants. Contamination will reduce the quality of your oil and may make it unusable.
  • Do not distill a batch for too long (check recommendations for the specific plant), as this will add little additional oil but may possibly contaminate your batch with unwanted chemical compounds.

Things You'll Need

  • Distillation equipment, including at least a tank or retort, a condenser, a furnace or other heat source and a separator.
  • Glass tubing to connect distillation components
  • Plant materials from which to extract the oils
  • Containers made of dark glass or stainless steel in which to store the oils

Sources and Citations

Edited by james_uk, Waited, Jack Herrick, Jlassroxursox and 29 others
Originally Posted by http://www.wikihow.com/Make-Essential-Oils
..

Wednesday, January 1, 2014

2014 - The year to start using or start making Better Soap for your body


Have a great new year"LAVENDER" SOAP BY JESSIEPEARL'S HANDMADE SOAPS.  The most common purpose for lavender today is aromatherapy. Well known as a sleep-promot...

2014 - The year to start using or start making Better Soap for your body

If you are reading this blog then you already know the benefits of natural handmade soap made in small batches using only the finest carrier oils, essential and fragrance oils and colorants.  No more harsh chemicals for yur family's skin!

Please sign up for our blog to keep current with new offers, recipes and ideas.  If you have a question, comment or idea please contact us - jessiepearl@mindspring.com


..

Sunday, December 29, 2013

DIY - Choosing a mold – A Soapmaking Tutorial

Choosing a mold – A Soapmaking Tutorial

There are many types of molds you can use for soaping ranging from more expensive wooden loaf and slab molds to inexpensive “found” molds including Pringles cans, yogurt cups and shoe boxes.

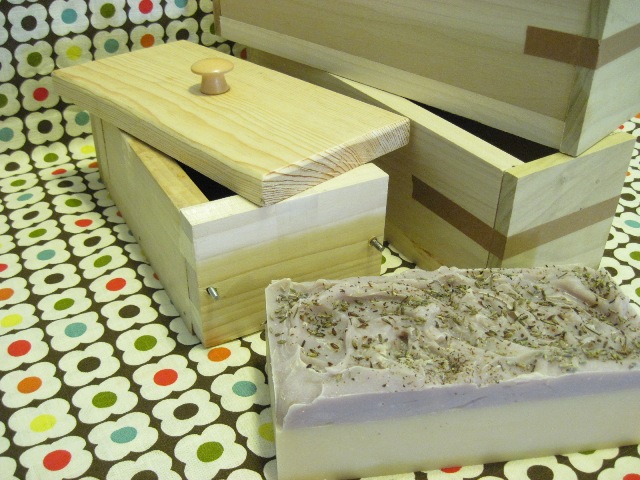
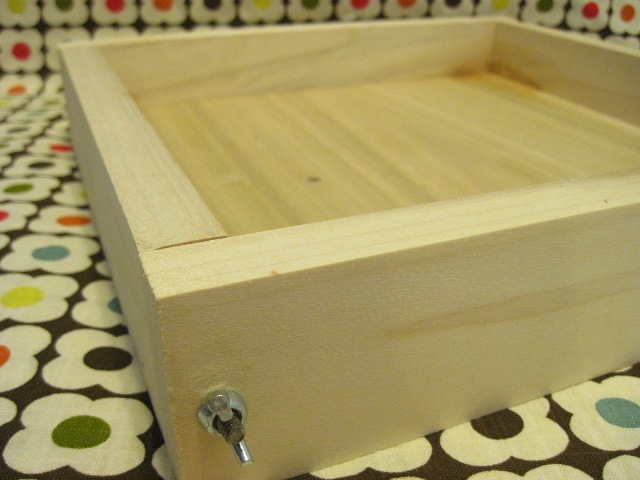
Wooden Loaf Molds – These molds must be lined using freezer paper or other method of lining. In my experience, soap usually gels* without added insulation. Soaping in colder climates might require more insulation such as towels or blankets to help force gel* completely. You’ll want to purchase a mold made of a hard wood such as poplar that is untreated. Treated wood can react if exposed to unsaponified soap as well as to heat in your oven if you choose to use your mold in the oven for any reason (such as forcing gel*).


Wooden Slab Molds – Same as wooden loaf molds.

Plastic or PVC Slab Molds – These are nice if you do not want your soap to gel. Some soapers even put these into the fridge or freezer to stop gel. If you do want to gel your soap, insulate well. You can try wrapping your mold in towels and even putting it on top of a warm heating pad to add heat and help force gel*. Soap can be trickier to remove from plastic molds especially if un-gelled or if molds have intricate designs and crevices. Try preparing your mold with mineral oil or add beeswax to your recipe to help release your soap easier.

Individual Cavity Molds – same as Plastic or PVC Slab Molds. Individual cavity molds are especially good for salt bars as they don’t require cutting.

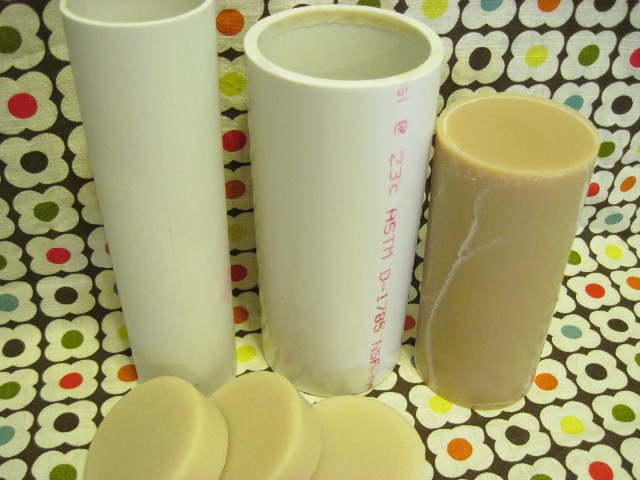
PVC Pipe – Great for making round soap. Molds don’t need to be lined but can be prepared with mineral oil to help soap release easier. After pouring in soap, cover with plastic wrap and a dish towel to insulate the top of mold. Leave soap in mold for 24-48 hours, pop in freezer for an hour and push soap out one end. Slice to desired thickness. I typically get a full gel using PVC pipe. These are the molds that I use in all of my Cold Process Soap classes that I teach. They’re inexpensive and can be used over and over again.
 Great idea! PVC pipe warmed at 200 degrees for 20 mins.  Then squished with rolling pin.
Great idea! PVC pipe warmed at 200 degrees for 20 mins. Then squished with rolling pin.

Yogurt cups, Cream Cheese containers and other plastic food containers – Great for small batches or “overflow”. I keep a handful of these containers around for left over soap after I’ve poured my wooden loaf mold. They do not need to be lined.

Shoe boxes and other cardboard boxes – These molds need to be lined. They must be insulated well if you want a full gel*. Use towels, blankets and even a warm heating pad to help force gel*.

Plastic storage boxes and Tupper Ware containers – If containers are thicker and not easily flexible, you will need to line in order to remove your soap easier. If the container is more flexible, then you may not need to line. They must be insulated well if you want a full gel. Use towels, blankets and even a warm heating pad to help force gel*.

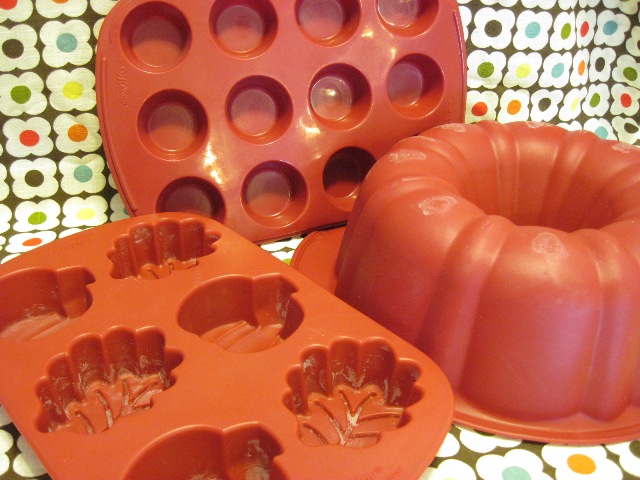
Silicone Baking Ware – Great for soaping! These types of molds do not require lining and soap is easily removed because of the flexibility. They must be insulated well if you want a full gel*. Use towels, blankets and even a warm heating pad to help force gel*. Since silicone can withstand high heat, you can even put your mold in a warm oven to help force gel*.


Pringles Cans – Can be used lined or not. If not lined, you can simply peel the container away from the soap and throw away. If you line with freezer paper, you can sometimes get more than one use out of the container. They must be insulated well if you want a full gel* or can be put into the fridge or freezer to prevent gel*.

Orange Juice Containers – Square cardboard orange juice containers make great molds and produce large square bars of soap. You do not need to line them since they have the waxy coating to begin with. Once your soap hardens you can peel away the container. They must be insulated well if you want a full gel* or can be put into the fridge or freezer to prevent gel.*

Other molds you can use include wooden drawers, cigar boxes, shipping tubes…the list goes on and on.

(* Gel as used above:
Soap gels during saponification.  If it is your first time, you may look at your soap in the mold and be very worried if you catch it in gel.  It may turn clear or look like vaseline and the mold will be hot to the touch.  This is a normal part of saponification, but not all soaps gel.  You will find milk soaps generally gel no matter what you do.   Others you may have to force to gel by covering and insulating.  Soap that does not gel will still be lovely though softer when you go to cut it - it will harden up later though!  )
Originally Posted on http://www.lovinsoap.com/2010/07/choosing-a-mold-a-cold-process-soapmaking-tutorial/

Aromatherapy For The Winter Blues

DIY Aromatherapy For The Winter Blues


Originlly Posted on http://www.theyummylife.com/Natural_Room_Scents

Here's the thing. I'm married to a man who hates artificial scents of any kind. That goes for air fresheners, candles, perfume, soaps and anything else that is scented. We buy unscented everything. I could probably buy a car with the money I've saved on perfume throughout the years of our marriage.

Turns out that King-Man may just be ahead of his time. I've recently been reading about air fresheners and their harmful ingredients. Many of them are especially hard on people with allergies and asthma. One more thing to stay away from.

But, the air in my house gets stale sometimes. Or, the day after I've cooked with garlic, that aroma that was so appealing when I was cooking becomes very unpleasant. I want to walk into my house and have it smell pleasant. Nothing overpowering or even that noticeable. Just pleasant.

There is a simple, all natural, truly lovely solution. That is to fill the air in my home with subtle scents of spices, herbs, and fruit. All I have to do is simmer some sweet smelling ingredients in water. The steam fills the air with a pleasant scent. Truth is, I did this many years ago on the advice of our realtor when we were selling our house. Realtors often advise sellers to bake cookies or boil cinnamon water right before a potential buyer drops by. That inviting aroma goes a long way to leave a good first impression. Why I didn't continue scenting the air in a similar way for our own enjoyment, I don't know.  I've now got a simple routine going that keeps our house smelling pleasant without staleness or day-after garlic odor.

Keeping the supply list simple. I only used items available at the grocery store or in my yard for these scent recipes. I want this to be easy and inexpensive so that I can set up a sustainable routine of pleasantly scenting our home. These recipes are simply guidelines and don't have to be followed exactly. In fact, I change them up all the time based on what I have on hand in my kitchen or yard.

How to Make Natural Room Scents
Fragrant items for naturally scenting your home:
  • citrus -- I've tried other fruits. Some of them smell good initially, but they don't hold up for more than one use. Citrus is sturdier, longer-lasting, and gives these scent recipes freshness. Lemons and oranges are particularly fragrant and have the best staying power in these scented waters.
  • herbs -- Any herb can be used for making a room scent, but the ones that are sturdier and on woody twigs hold up the best. My favorites for room scents are rosemary and thyme.
  • pine or cedar twigs/needles -- There may be other fragrant trees that will work, too; pine and cedar are the two I've tried for their appealing, fresh fragrance.
  • extracts -- A touch of vanilla or almond extract improves most room fragrance mixtures. Mint extract has a nice fresh scent. You can also use whole vanilla beans instead of vanilla extract; pricey but amazingly fragrant. Amazon has a good bulk price (80% less than grocery store prices).
  • spices -- You can use ground or whole sweet spices. The whole spices look prettier, if your scented water will be in a location where it will be seen. I have found that cinnamon sticks and whole cloves have the most scent staying power. Cinnamon sticks can be rinsed off and reused several times. They keep on giving.

Scents_for_home2.jpg
Five Natural Room Scent Recipes
These are all scents that my nose likes. But, scents that are pleasing to one person may not be to someone else. Consider how many different scents of perfumes, soap, and candles there are in stores in an effort to appeal to the masses. So, use my recipe combos as guidelines that you can tweak and customize to suit what your nose likes.

General procedure: Combine the ingredients in a 2 cup (pint) jar or container, or in a pan on the stove top. Cover them with water and heat. I'll explain different heating options further down. Keep reading.
Scent #1: Oranges, cinnamon & cloves (allspice and anise are optional). This is my favorite, both for it's wonderful aroma and for it's staying power. This scent carries into multiple rooms better, and it can be reheated to scent your rooms for several days.Scents_for_home4.jpg

Scent #2: Lemon, rosemary, & vanilla. A similar scented water is often simmering in Williams-Sonoma stores. It has a lovely freshness to it.  Scents_for_home5.jpg

Scent #3: Lime, thyme, mint & vanilla extract. This combination has such a fresh, pleasant scent. I initially made it without the mint extract, but have found that it really kicks up the aroma.Scents_for_home6.jpg

Scent #4: Orange, ginger (fresh or powdered), and almond extract. This is a sweet, delicious scent. Scents_for_home7.jpg

Scent # 5: Pine or cedar twigs (or other fragrant twigs), bay leaves, and nutmeg. These scents combine for a complex aroma. If you have whole nutmeg, use a microplane to grate off the outer surface--this will release the scent. Add the whole nutmeg piece along with the gratings.
not_used5.jpg

Here's the gang of five. Aren't they beautiful? I like to make these up in pint jars and keep them on hand in the fridge so I'm ready to start a pot of simmering scents as needed. IMG_3846.jpg

Make ahead and...
  • ...store in the fridge. Uncooked jars of scented waters will keep in the fridge for 1 to 2 weeks, so you can make these ahead to have on hand. I recommend adding all of the ingredients, including the water, to the jars before refrigerating them. I've tried refrigerating the fruit/spice/herb combos in jars without the water, but they don't last as long that way.
  • ...freeze them.  I've tried freezing them both with and without the water added, and both ways work fine. I haven't tested them in the freezer longer than 2 weeks, but I'm confident that they can be frozen for a month or longer. Make sure you use freezer-safe jars like these pint wide-mouth mason jars. (Not all mason jars are freezer-safe.)
How to heat the scented mixtures
I've tried a variety of methods, and all of these work to varying degrees. Some of them provide a more powerful scent than others. Just like the air fresheners you buy, none of these will scent a whole house; but I'll show you some ways to set up individual scent sources in multiple rooms. Hopefully you already have what you need to try out one or more of these options.

Stove top method. This is by far the best way I've found to get the most powerful scent that will spread to more rooms the fastest. It's easy as can be. Simply combine the ingredients in a pot on the stove, bring them to a boil, and then lower the heat to a simmer. They will immediately begin to scent your kitchen and spread to other rooms. How far the scent spreads depends on the size and layout of your house. A simmering pot like this makes all four rooms on our first floor smell good. The only drawback of this method is that you have to keep a close eye on the water level. If the pan dries out, you'll be smelling burned citrus instead of sweet, fragrant citrus.  NOTE: For a stronger scent, simply double or triple the recipe in a larger pot on the stove.
IMG_3901.jpg

Uncovered Slow Cooker Method. This is my personal favorite. I use a mini slow cooker--the kind made for keeping dips and sauces warm. Mine only has one low heat setting. The mixture never actually bubbles and visibly steams. I leave it uncovered on my kitchen counter to slowly release scent throughout the day. It's subtle, but creates a pleasant smell in my kitchen and a hint of scent in surrounding rooms. When I'm home, I keep my mini slow cooker going. It's easy and uses very little electricity. When I fill mine in the morning, it won't dry out for an entire day. If you're concerned about accidentally letting it run dry, you can put a lamp timer on it so that it automatically shuts off at the desired time. I put a scented jar mixture in the microwave for 2 minutes to get it really hot before I add it to the slow cooker. That gives it a jump start on releasing the scent.  NOTE: For a stronger scent, simply double or triple the recipe in a larger, full-size slow cooker and set it on high.

♦16 oz. mini slow cooker --holds a single batch--compact & economical--removable insert for easy cleaning; this is the size I use for regularly simmering scented water in my kitchen and is a great size for gift giving, too.
♦1-1/2 qt. small slow cooker  --holds double or triple batch--removable insert for easy cleaning; the larger size doesn't have to be refilled as often.
♦on-off lamp timer --for auto shut-off
Scents_for_home9.jpg

Fondue Pot Method. If you have a fondue pot, then you have a portable scent station. Set it up in any room you'd like to scent. Below is a small ceramic fondue pot I have that uses a tea light for heat. So, this will only remain warm as long as the candle lasts--3-1/2 to 4 hours. Like the slow cooker, this is a low level of heat and releases a very subtle scent--enough for a small room. Get the scent mixture boiling hot before adding it to the fondue pot. I like to set this up in our entry way when we have guests. It makes it smell wonderful when you walk through our front door. And, it looks pretty.
IMG_3882.jpg

Mug Warmer Method. I normally keep this little mug warmer next to my computer to keep my coffee and tea warm. I've discovered it also can be used to keep a jar or small bowl of scent mixture warm. It only keeps it warm, it doesn't actually heat it up. So again, be sure to heat the mixture before adding it the bowl. Or microwave a jar and set it right on top of the mug warmer. This low heat puts off a soft, subtle scent that is suitable for a small area like a bathroom.
  • Here's a hint to keep it pretty. As the mixtures cook and lose their color, they're not as attractive. You can spruce it up by floating a fresh slice of citrus on top. Or add a few cranberries (I keep a bag of them in my freezer); they float and add a touch of color.
Scents_for_home11.jpg

Candle Warmer Method. These work just like the mug warmers. Candle warmers come with a little bowl on top for melting scented candle pellets. Instead, you can add some heated scented water. Or, remove the bowl and set a jar or other bowl on top.
  • Note: I tested the temperatures of these with a thermometer. The mug warmer and candle warmer both kept the mixture at about 120°F. That's enough to let off a very subtle scent in a small area or room, but don't expect these to strongly scent a big room. You need more heat and steam for a stronger scent.
Scents_for_home13.jpg

Tea Pot Warmer Method. My tea pot warmer also uses tea lights. I can put two or three tea lights in mine to achieve the temperature I want. These only last as long as the tea lights burn, but they can get hotter than the mug and candle warmers, thus releasing more scent. I can put a bowl or jar on top of my tea pot warmer, as long as I put it somewhere that I can keep an eye on it. I don't like to leave candles unattended.
view on Amazon:  cast iron teapot warmer
Scents_for_home12.jpg

Add more hot water as needed. As the water evaporates from any of these warming bowls or jars, top it off with additional HOT water. It needs to be hot when it's added so that it doesn't cool down the temperature of the scented water.  Higher heat = more fragrance.

Gift them! These make a fun, unique hostess gift. Take one along to a party as a gift for your host that can be simmered and enjoyed the next day.

Reuse each mixture 2-3 times. After these have been heated and simmered for awhile, the water becomes cloudy (as you can see in the jars below), and some of the ingredients lose their vibrant color. Although they don't look as pretty, they still smell good. Usually, you can reheat and simmer these again 2-3 times. Jar them up and refrigerate them between uses. Open the jar and give it the sniff test--if it still smells good, reheat and reuse it. Add more water as needed.Scents_for_home10.jpg

Cost saving tips
You can save, use and reuse a number of fragrant ingredients. These scents don't need to be expensive.

  • Leftover ginger --  If you ever cook with fresh ginger and end up with leftover pieces , this is a way to use them up before they spoil. Slice the leftover ginger and freeze it in a bag or container to have on hand for whipping up a quick batch of scented water. 
  • Save your orange peels -- When you eat an orange, save the peel for use in scented waters. Store them in the refrigerator or freezer until you need them.
  • Save your juiced lemons and limes -- After you've juiced these for use in a recipe, refrigerate or freeze the leftover pieces.
  • Save your leftover herbs -- If you have herbs in a garden or have leftover herbs that you've purchased for cooking, they can be frozen and saved for use in these scented waters.
  • Use expired juices. If you have fruit juices that are past their prime, use them as a base in place of the water in these mixtures. They're both fragrant and colorful.
  • Use expired spices. Spices are supposed to be replaced after a year, because they lose much of their flavor. But, they still smell good! Instead of throwing out old spices, use them for scenting water.
squareIMG_3862.jpg

There are endless combinations for these scented waters
..

Thursday, December 26, 2013

'Herbal Explosion' of honey & herbal blend of eucalyptus, spearmint, and a hint of basil

'Herbal Explosion' Havenly Honey Soap BY JESSIEPEARL'S HANDMADE SOAPS.

Invigorate your body with this herbal blend of eucalyptus, spearmint, and a hint of basil to mellow your mood. This clean fragrance will ignite your senses, giving you the ultimate bathing experience.

Ingredients: Olive Oil, Coconut Oil, Palm Oil, Distilled Water, Sodium Hydroxide (lye) , Havenly Honey, Castor Oil, eucalyptus, Spearmint, and Basil Fragrance Oil.

Due to being completely handmade and hand cut, each bar of soap is approximately 4.5-5.5 oz..

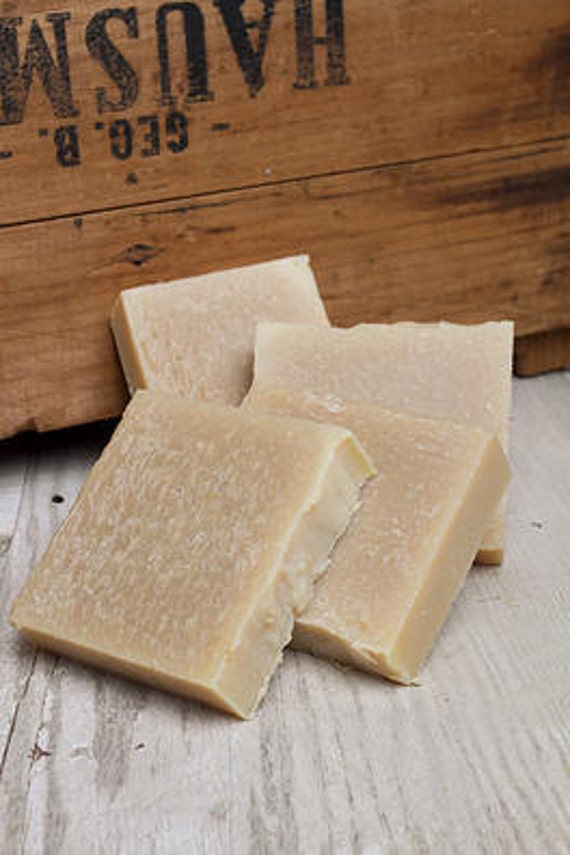
Two Bars of  'Herbal Explosion' Havenly Honey Soap with herbal blend of eucalyptus, spearmint, and basil to mellow your mood
  Havenly Handmade Soaps are made utilizing delicious and beneficial honey and beeswax. All recipes contain all natural ingredients that were hand selected by the talented Blue Haven Bee Team!

Honey has a naturally delicate, sweet scent and has unbelievable moisturizing qualities. It gives our Havenly Honey Soap a rich lather while offering anti-bacterial, anti-inflammatory, and therapeutic qualities.

Combining honey and lye, Havenly Honey soaps help skin irritations, acne, poison ivy, and it can even help aging and wrinkles!

No dyes are used during the soap making process. Our Havenly Honey offers its own beautiful color; you can even see the layers of honey in our soap!

https://www.etsy.com/listing/167132695/two-bars-of-herbal-explosion-havenly?ref=shop_home_active
..